Desserts are almost always worth that extra prep time. Goan desserts, too, can make for fulfilling treats, despite the somewhat arduous process. Most sweet delicacies from the region rely on signature coastal ingredients and boast Portuguese and Konkan influences. When it comes to local desserts, coconut, jaggery, semolina and red rice usually find centre stage in Goan kitchens.
Come Christmas, Goan households follow the tradition of exchanging dessert platters punctuated with classics such as Bebinca, Dodol, Pinaca, Bolinhas, and Baath, which are usually made by following heirloom recipes that have been safeguarded by generations of Goan families.
My Kolkata shares a few traditional recipes and pointers from experienced bakers so you can recreate these Goan classics at home!
Bebinca
Often referred to as the ‘queen of Goan desserts’, Bebinca is a layered cake made with flour, coconut and egg yolk. The essence of a good Bebinca lies in the smoky notes of a caramelised (nearly burnt) outer layer. “Bebinca usually has seven layers to it. While cooking, make sure it doesn’t become rubbery so you can get the perfect caramelised effect. It’s important for the dish’s flavour and look. It must look appealing to the eye,” says Debra Alexander, owner of Kolkata’s Goan bakery, Saldanha Bakery.
Here’s how you can make a Goan Bebinca at home:
Ingredients:
- Castor Sugar: 1 kg
- Coconut milk: 3 cups
- Egg yolks: 20
- Flour: 100 gms
- Nutmeg: ½ tsp (grated)
- Cardamom essence: 2 tsp
- Ghee: 1 cup
Method:
- In a mixing bowl, mix the castor sugar into the coconut milk till it’s completely dissolved.
- Beat the eggs till frothy and add to the coconut milk and sugar mixture. Mix the flour in well, and make sure no lumps remain. Add in the nutmeg and cardamom.
- In a deep, heavy-bottomed pan, add a tablespoon of ghee. Let the ghee dissolve on medium flame. Switch the flame off and pour in a layer of the mixture (around 1/4th in thickness). Cook the batter on a medium flame until it turns a deep brown colour. Remove from flame and add a tablespoon of ghee to the layer.
- Next, add another layer of the batter. Repeat this process till all the batter and ghee is over. The batter must be in the same proportion for each layer.
- Once the pan is cool, overturn the layered sweet into a plate and your Bebinca is ready!
Dodol
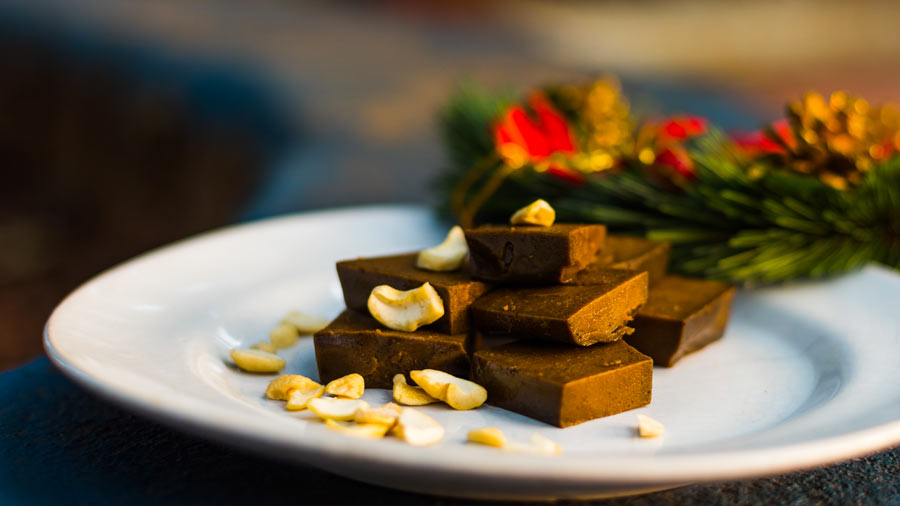
The sticky, toffee-like confection uses three main ingredients — coconut, jaggery and rice flour. Chopped cashews add a bit of a bite to the dessert and the jaggery adds sweet, heady notes — making it slightly different from other Goan desserts.
“Dodol has both sugar and jaggery because sugar provides a reflective glaze, which adds to the appearance of the final product. When making the dodol at home, you’ll know it’s ready when a spoon of the mixture holds its shape on a plate and doesn’t stick to the fingers,” says Tabitha Dias, who along with her mother Florency Dias, runs a YouTube channel exploring Goan fare. If you’re trying your hands at dodol at home, try this recipe:
Ingredients:
- Grated coconut: 400 gms
- Jaggery: 500 gms
- Rice flour: 110 gms
- Sugar: 2 tbsp
- Salt
- Chopped cashews (some even use peanuts): 10-12
- Halved cashews for garnish
Method:
- Prepare the thick coconut extract by grinding the coconut in the blender with 2 cups of water; squeeze through a sieve and keep it aside. For the thinner extract, grind the pulp using 5 cups of water and extract the thin milk.
- Add the jaggery to the thin milk and stir it till it dissolves completely.
- Grease the moulds you’ll be using, to set the dodol, with a little oil. You won't have time to do it later when the dodol is about ready!
- In a vessel, take the rice flour and strain the coconut milk-jaggery solution and mix together; pour a little at the start (2-3 ladles) making a smooth, runny paste and then pour in all the solution to avoid lumps.
- Add the sugar. Continue stirring upon the stove.
- Heat it on a medium to high flame stirring constantly till it comes to a boil. Add the salt and pour in the thick coconut milk. Remember to keep stirring and scraping the bottom as you do so. Regulate the heat between medium and high.
- As it gets closer to being ready (at about 45 minutes into the cooking time), the dodol changes colour and turns darker. Add the chopped cashews. To check if done, spoon a little onto a plate; after a few seconds, the spooned portion must be able to hold its shape and not stick to the finger when touched.
- Pour it into the greased moulds and tap it to minimise air entrapments. Garnish the top with nuts, if you choose. Let it rest for about 30 minutes or till it completely cools before unmolding.
- Cut into pieces and serve!
Pinaca (Pinarg)
Pinaca is of the most interesting (and well-loved) Goan desserts. This coconutty rice cake has rich, earthy flavours that leave you longing for more. “While making Pinaca, remember to make sure it’s not dry. The consistency needs to be soft because you will eventually have to roll it out into two-inch rolls,” says Debra.
“This isn't a technique-sensitive dessert. It is fairly easy and flexible in terms of measurements and allows you to control its sweetness and moistness. So shape and sweeten it as you wish!” says Tabitha.
Ingredients:
- Parboiled Goan rice (red rice as a substitute): 380 gms
- Freshly grated coconut: 200 gms
- Palm jaggery: 120 gms
- Cane sugar (yellow jaggery): 120 gms
- Fine grain sugar: 1 tbsp
Method:
- Clean the rice grains using a kitchen towel. The rice must be dry.
- Dry roast the grains on a medium to high flame and keep stirring frequently to avoid burning them. They will start to puff and pop as they cook.This may take about 8-10 minutes. Turn off the heat when well-roasted and set aside to cool. Transfer it onto a plate to cool faster.
- Once cooled, grind the rice grains into a fine powder and set it aside.
- Grind the grated coconut to ensure evenness throughout, eliminating any large bits, if present. It must not be very fine; slight coarseness will provide a better texture to the Pinagr.
- In a large, heavy-bottom vessel, heat the jaggery and sugar (optional) and let them melt and mix. Turn off the heat when done.
- To this melted mix, add the coconut and combine well.
- Then, stir in the powdered rice in batches and mix till it's well incorporated.
For the cake:
- Spoon the mixture onto a plate upon which you choose to prepare the cake. Press down and shape the mixture using a spatula/greased butter paper. Leave it undisturbed for about an hour to acquire firmness.
For the rolls:
- With a clean hand, pick some of the mixture and shape it into a basic roll between the fingers and the palm. Roll this over a flat greased plate/surface to shape into cylinders and tap the ends for neat flat sides.
Bolinhas
An old-time favourite, Bolinhas are delicate, crunchy and honeyed treats that resemble cookies. Though it has a rather tough exterior, one bite reveals the light, airy textures present. “Bolinhas are commonly shaped into dome-shaped cookies with a cross on the top. They're very rustic cookies!” says Tabitha. Debra’s advice is to ensure it’s crunchy on the outside and soft on the inside. So, monitoring the heat and time is essential to get the perfect consistency.
Ingredients:
- Fresh coconut: 250 gms
- Semolina: 250 gms
- Granulated Sugar: 250 gms
- Salted butter (room temperature): 60 grams
- Eggs: 3
- Cardamom powder: 1/2 teaspoon
- Salt
Method:
- Dry-grind the coconut and set it aside.
- Dry roast the Semolina till aromatic, on a low flame. This may require 6-7 minutes. Don't brown the grains as that could affect the colour of the ‘bolinha’.
- In a large bowl, combine the butter and sugar. Don't aim to dissolve the sugar; it will melt as it cooks later.
- Separate the egg yolks and add them into the butter-sugar mixture, and beat this well. Ensure that egg whites remain free of the yolk matter (even a little bit of the yolk can stop the whites from getting foamy)
- To this, add the roasted semolina, salt and cardamom, and mix they are all combined.
- Next, add the ground coconut and mix well.
- In a separate (large and clean) bowl, whip up the egg whites till foamy and fluffy. Try to reach the soft-peak stage.
- Fold this into the batter and refrigerate for 6 hours.
- After the stated time, the mix will be firm like a dough; grease your palms with some oil and shape these into spheres using about a tablespoon of the mixture. Place them on a baking pan keeping plenty of space between them all and mark them using a greased knife in any pattern you like. If the mixture gets sticky after some time, refrigerate again for a while.
- Bake these at 180 degrees Celsius for 30-35 minutes till the tops are a lovely golden brown. Then allow them to cool upon a cooling rack.
Baath (Baatk)
Baath is Goa’s answer to English teacakes! The classic Goan dessert resembles a dense pie and is commonly known as Batica. “The baath cake recipe comes out best when the batter has sat for 6-8 hours or overnight,” says Tabitha. “You need to allow the mixture to ferment for a while. Overnight is the best way to go,” confirms Debra.
Ingredients:
- Ghee/Dalda: 1 tbsp
- Semolina: 250 gms
- Grated coconut: 220 gms or 2 small coconuts
- Granulated sugar: 300 gms
- Eggs: 3
- Salted butter at room temperature: 125 gms
- Vanilla essence: 1 tap
- Cardamom powder: 1/2 tsp
- Salt
Method:
- Heat the clarified butter/dalda in a vessel and add the semolina to it and fry it for 2-3 minutes on a low flame. The objective is to coat the semolina particles; do not brown them. Then let it cool.
- Grind the grated coconut without water using a dry grinding blade.
- Beat the egg yolks with sugar. The mix must turn pale yellow; don’t be concerned about the undissolved sugar.
- Add the vanilla essence, the cardamom powder, the butter and salt and mix well.
- Incorporate all the ground coconut. The batter will be thick.
- When combined, add the roasted semolina and mix well.
- In a separate bowl, beat the egg whites till nice and fluffy (soft peak stage) and fold them into the prepared batter and mix well.
- Cover it and let it rest for 8 hours at room temperature.
- Grease a baking tin with oil, line it on the bottom and sides with parchment paper and brush some oil over that as well.
- Transfer the thick batter into the tin and smoothen the surface. Tap it upon the counter 3-4 times to ensure no gaps are present within. Bake this at 160 degrees Celsius for 45 minutes (middle rack) or till a skewer inserted in the centre comes out clean.
- Once baked, keep it in the oven for 15 minutes; another 15 minutes with the oven door opened slightly. Then, let it cool completely at room temperature. Remove from the mould, and pull away the parchment gently.
Perada (Guava Cheese)
Perada can be served as jelly on bread but it can also be sampled as a standalone dessert. The fruity flavours of guava tango with the zesty lime notes, resulting in a delightful spread. “Perada is tedious to make! Make sure you stir the mixture constantly till it leaves the sides of the pan. You’ll have to stir and stir as you’re cooking it. But once you take a bite of it, it’ll all be worth it,” smiles Debra.
Ingredients:
- Guavas: 1 kg
- Water: 6 cups
- Sugar: 750 gms
- Lemons: 2
- Butter: 2 tbsp
- Salt
Method:
- Wash and cube the guavas. Simmer them in a deep pan on medium heat.
- Cook them till the pieces have reduced to half in quantity and are pulpy.
- Remove front the heat and sieve the pulp using a fine sieve. Then put it back on the heat and cook till it thickens, leaving the sides of the pan.
- Take off the heat and put the mixture onto a flat surface. Flatten the Perarda till it’s about ¼th in thickness.
- When cool, cut into diamond shapes. And your Perada is ready!


